Valentine’s shaker card
Today’s card is one of my absolute favourites of the Valentine’s series. It’s fun, it’s cute and it looks a lot harder to do than it really is. These cards are really versatile, too. Just by using different colours of card stock and different shapes of confetti (or glitter) you can make Christmas cards, baby shower invitations, wedding cards and so much more!
The secret to making this card are having two items that one does not usually keep on hand for card making: foam mounting tape and clear document protective sheets, both of which can usually be found in your local office supply store.
Supplies:
· Sheet of 8 1/2” x 11” red card stock
· Sheet of 8 1/2” x 11” white text paper
· Clear protective sheet
Equipment:
· Computer
· Printer
· Paper trimmer
· Bone folder
· Pencil
· Metal-edged ruler
· Craft knife
· Double-sided tape
· 1/2” foam mounting tape
· Mini heart punch
Directions:
1. Create a 3 3/4” x 5” document with 1/2” margins in a design layout program. Write the text, “Happy Valentine’s Day” and add decorative images as desired (I used this one). Print the document.
2. Use the paper trimmer to cut the red cardstock into two 5 1/2” x 8 1/2” pieces. Cut one of those pieces in half to get two pieces, measuring 4 1/4” x 5 1/2”. Set one aside for future projects. Trim around the sentiment on the white paper to get a 3 3/4” x 5” rectangle for the front panel. Cut the protective sheet to get a 4” x 5 1/4” rectangle.
3. Fold the 5 1/2” x 8 1/2” red card stock into a 5 1/2” x 4 1/4” card with the bone folder.
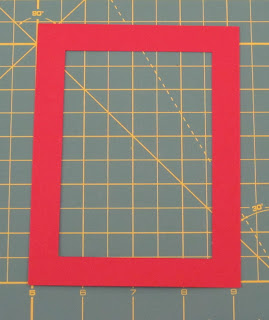
4. Mark a 9/16” border all the way around the 4 1/4” x 5 1/2” piece of red card stock.
5. Use the craft knife and ruler to cut out the marked border.
6. Attach the 4” x 5 1/4” protective sheet “window” to the marked side of the border piece of card stock, using the double-sided tape. Make sure that the window is securely attached with no gaps.
7. Punch red and white hearts from the left over paper and card stock (use the piece cut out from the border piece for the red hearts) with the mini heart punch. I ended up punching 50 of each colour.
8. Attach the “Happy Valentine’s Day” panel to the front of the card with the double-sided tape.
9. Place the punched out hearts on top of the front panel of the card, grouped towards the centre.
10. Attach the foam mounting tape around the edges of the back side of the red card stock window. Make sure there aren’t any gaps (or else the confetti will escape). Peel off the paper backing to expose the adhesive.
11. Firmly attach the window on to the front panel of the card, lining up all of the edges. Shake the card to distribute the heart confetti.
Notice: From now on, I will be updating Card Tricks on a weekly basis on Fridays. I love doing this blog and creating all these fun cards, but it’s taking up a lot more time than I had thought, and I need to start focusing on some other aspects of my life as well as Card Tricks. As a bonus, with only one post per week, I’ll be able to come up with more creative cards! See you next Friday, everyone!


No comments:
Post a Comment