Showing posts with label Valentine's Day. Show all posts

Friday, February 11, 2011

Countdown to Valentine's Day: Card 5

Conversation Heart card


Today brings us to the last card in the Valentine's Day series. It's a cute and fun card that brings back memories of passing those bright and colourful (yet, oh so chalky!) hearts around the grade two classroom, everyone hyped up on too much sugar and the excitement of the holiday. We had so much fun decorating those brown paper bags, taping them to our desks and then running around delivering those little Disney or Looney Tunes themed paper Valentines. The day was so innocent then - it was all about arts and crafts, candy, and a day full of fun school games. And so, in an attempt to recapture that innocence, here is the Conversation Heart Valentine.

Supplies:
·      Sheet of 8 1/2" x 11" red card stock
·      Sheet of 8 1/2" x 11" white text paper

Equipment:
·      Computer
·      Printer
·      Paper trimmer
·      Bone folder
·      Heart border paper punch
·      Large heart paper punch (approximately 2" wide)
·      Mini heart paper punch
·      Glue stick
·      Piece of wax paper
·      Heavy book for pressing

Directions:
1.     Create a new 8 1/2" x 11" document in a design layout program. Make a 4" x 6" text box and write in three conversation heart sayings (like "BE MINE" "SWEET HEART" and "KISS ME") using capital letters in a sans serif font (like Arial). Centre the text and space the sayings so that there is room to punch large hearts around them. Print the document.

2.     Use the paper trimmer to cut the red card stock in half to make two pieces, measuring 5 1/2" x 8 1/2". Set one piece aside for future projects. Trim the white text paper so that there is a large border around the three sayings. Trim the rest of the paper into a 4 1/4" x 5 1/2" rectangle. Set the rest aside to use in step six.

3.     Fold the remaining card stock piece with the bone folder into a 4 1/4" x 5 1/2" card.

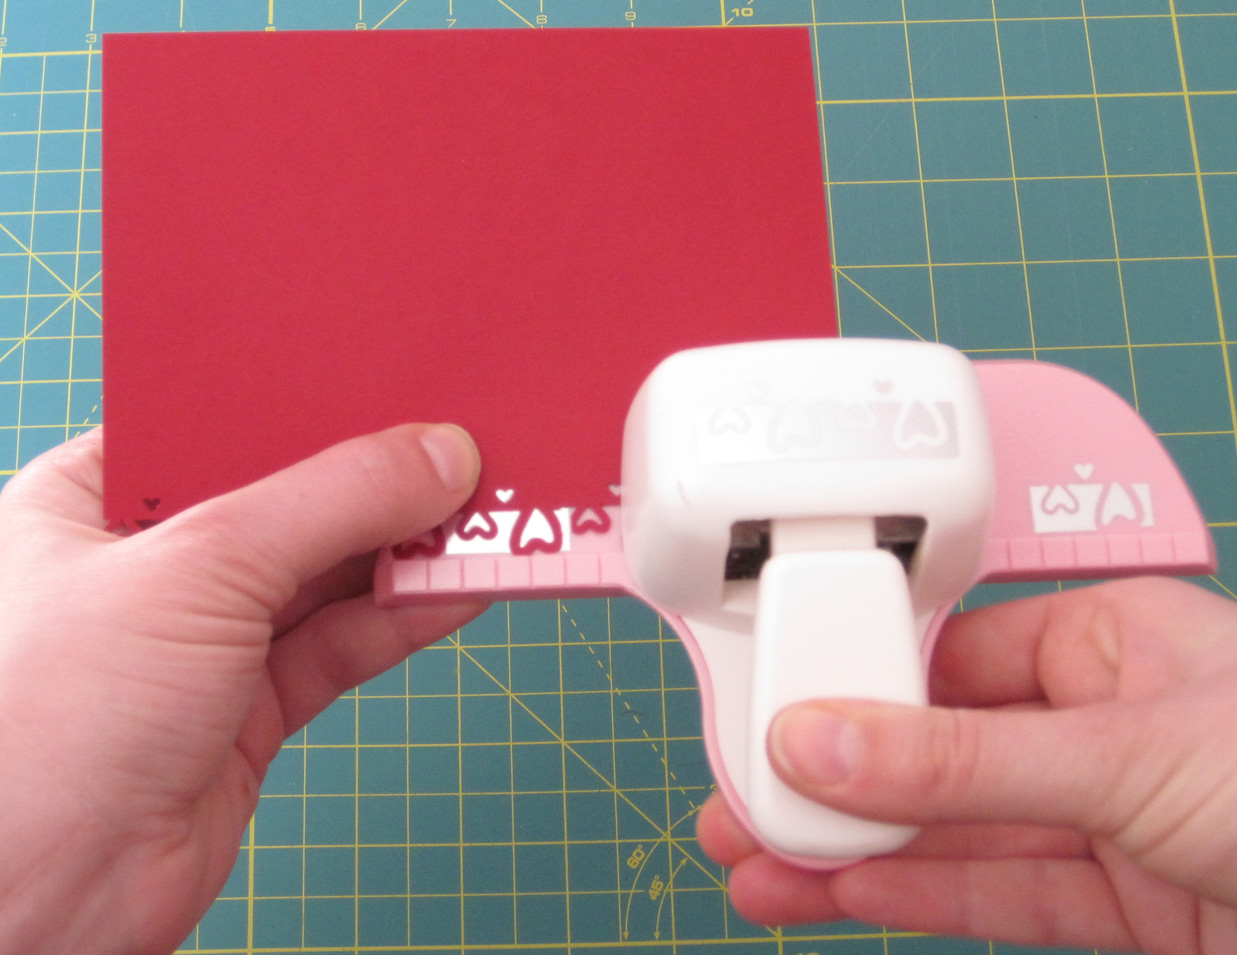
4.     Use the heart border paper punch to punch the right edge of the front panel of the card.


5.     Glue the 4 1/4" x 5 1/2" piece of white text paper into the right inside panel of the card.


6.     Use the large heart paper punch to punch out the conversation heart sayings (centre the text in the middle of each heart). Use the mini heart punch to punch out six mini hearts from the remaining white text paper.


7.     Glue the three large hearts down the middle of the card with the glue stick. Take the mini hearts and glue them around the large hearts.


8.     Place the wax paper over the folded card. Put the heavy book on top and press until the glue is dry.

I hope you all have liked the cards in this series! I had a lot of fun designing and making them. See you next Friday!

Friday, February 4, 2011

Countdown to Valentine’s Day: Card 4


Key to my heart card and gift bag


 It’s the first post of February and time to get back on the countdown to Valentine’s Day. Today, we have a card and gift bag combo, great for surprising that special someone this February 14.

Supplies:
·      Two sheets of 8 1/2” x 11” red card stock
·      Sheet of 8 1/2” x 11” white text weight paper
·      Scrap of coordinating patterned card stock, measuring at least 4” x 6”

Equipment:
·      Computer
·      Printer
·      Paper trimmer
·      Bone folder
·      Embossing stylus (optional)
·      Pencil
·      Scissors
·      Craft knife
·      Metal-edged ruler
·      Mini heart paper punch
·      Glue stick
·      Glue runner
·      Decorative edged scissors (I used the “double bubble” ones)
·      Wax paper
·      Heavy book for pressing

Directions:
1.     Using a design program, create an 11” x 8 1/2” (letter-sized) document in landscape layout with 1/2” margins. Insert a heart shape (measuring no bigger than 5 1/4” wide x 4” tall), two key images (one 1 1/2” long and one 2” long – I used this image) and the text, “You hold the key to my heart” as shown below. Print the document.


2.     Trim one sheet of card stock in half lengthwise with the paper trimmer to get two pieces, measuring 11” x 4 1/4”. Set one aside for future projects.

3.     Fold the 11” x 4 1/4” card stock in half to make a 5 1/2” x 4 1/4” card with the bone folder.

4.     Turn the card over so that the opening is on the left. Place the heart image over the card, lining it up so that the right edge overlaps the fold a little bit. Using the embossing stylus (or a pencil if you don’t have a stylus) to trace over the heart image to transfer the shape on to the card stock. Cut the card stock with the scissors to create a heart-shaped card (make sure to have the overlap so that you end up with one card that unfolds, not two heart-shaped pieces of card stock).


5.     Trim the patterned card stock with the decorative edge scissors to get one piece measuring approximately 3” x 1 1/4” and another measuring 2” x 1”.


6.     Cut out the key images with the scissors and the craft knife. Cut the individual words of the sentiment into little rectangles with the craft knife and the metal-edged ruler.


7.     Punch out six mini hearts from the left over patterned card stock.


8.     Glue the key images with the glue stick on to the patterned card stock rectangles. Glue the larger key on to the front of the heart-shaped card. Glue the text above and below the key image. Glue the mini hearts along the sides of the image.


9.     Place the wax paper on top of the folded card and press with the book until the glue is dry.

10. Mark the second piece of card stock with guidelines for the bag layout, using the template below. 

Bag template


11. Cut and score the guidelines, using the template as a guide.


12. Glue the small key image on to one of the large panels of the gift bag (on the opposite side of the pencil marks), centered underneath the handle.

13. Use the technique in step 9 to press the key image on the bag until the glue has dried.

14. Use the glue runner to glue the bag together, using the images below as a guide on how to fold in the panels.


Hope you like this card and gift bag combo. Have a wonderful weekend and I’ll see you next week for the final card in the Valentine’s Day Countdown! See you then!

Friday, January 21, 2011

Countdown to Valentine's Day: Card 3


Valentine’s shaker card


Today’s card is one of my absolute favourites of the Valentine’s series. It’s fun, it’s cute and it looks a lot harder to do than it really is. These cards are really versatile, too. Just by using different colours of card stock and different shapes of confetti (or glitter) you can make Christmas cards, baby shower invitations, wedding cards and so much more!

The secret to making this card are having two items that one does not usually keep on hand for card making: foam mounting tape and clear document protective sheets, both of which can usually be found in your local office supply store.

Supplies:
·      Sheet of 8 1/2” x 11” red card stock
·      Sheet of 8 1/2” x 11” white text paper
·      Clear protective sheet

Equipment:
·      Computer
·      Printer
·      Paper trimmer
·      Bone folder
·      Pencil
·      Metal-edged ruler
·      Craft knife
·      Double-sided tape
·      1/2” foam mounting tape
·      Mini heart punch

Directions:
1.     Create a 3 3/4” x 5” document with 1/2” margins in a design layout program. Write the text, “Happy Valentine’s Day” and add decorative images as desired (I used this one). Print the document.


2.     Use the paper trimmer to cut the red cardstock into two 5 1/2” x 8 1/2” pieces. Cut one of those pieces in half to get two pieces, measuring 4 1/4” x 5 1/2”. Set one aside for future projects. Trim around the sentiment on the white paper to get a 3 3/4” x 5” rectangle for the front panel. Cut the protective sheet to get a 4” x 5 1/4” rectangle.

3.     Fold the 5 1/2” x 8 1/2” red card stock into a 5 1/2” x 4 1/4” card with the bone folder.

4.     Mark a 9/16” border all the way around the 4 1/4” x 5 1/2” piece of red card stock.


5.     Use the craft knife and ruler to cut out the marked border.


6.     Attach the 4” x 5 1/4” protective sheet “window” to the marked side of the border piece of card stock, using the double-sided tape. Make sure that the window is securely attached with no gaps.
 

7.     Punch red and white hearts from the left over paper and card stock (use the piece cut out from the border piece for the red hearts) with the mini heart punch. I ended up punching 50 of each colour.


8.     Attach the “Happy Valentine’s Day” panel to the front of the card with the double-sided tape.


9.     Place the punched out hearts on top of the front panel of the card, grouped towards the centre.


10. Attach the foam mounting tape around the edges of the back side of the red card stock window. Make sure there aren’t any gaps (or else the confetti will escape). Peel off the paper backing to expose the adhesive.


11. Firmly attach the window on to the front panel of the card, lining up all of the edges. Shake the card to distribute the heart confetti.

Notice: From now on, I will be updating Card Tricks on a weekly basis on Fridays. I love doing this blog and creating all these fun cards, but it’s taking up a lot more time than I had thought, and I need to start focusing on some other aspects of my life as well as Card Tricks. As a bonus, with only one post per week, I’ll be able to come up with more creative cards! See you next Friday, everyone!

Wednesday, January 19, 2011

Countdown to Valentine's Day: Card 2


Lovebirds mini card


Happy Wednesday!

Today, for the second card in the Valentine’s Day countdown, we are going to use scrap paper to make a sweet little mini card. This easy to make card is the perfect size for attaching to flowers, boxes of chocolates and all those other romantic Valentine’s Day gifts.

Supplies:
·      Pink card stock scrap from Monday’s post
·      Square of pale pink card stock, measuring 2 1/2” x 2 1/2”

Equipment:
·      Paper trimmer
·      Bone folder
·      Decorative scissors (“cloud” pattern)
·      Black stamping ink pad
·      Lovebirds stamp
·      Black thin tipped marker
·      Mini heart paper punch
·      Glue stick
·      Glue runner

Directions:
1.     With the paper trimmer, cut the pink card stock from Monday’s post into a 3” x 6” rectangle. Save the scraps for step 6.

2.     Fold the 3” x 6” rectangle into a 3” x 3” card.

3.     Cut around the edges of the pale pink card stock square with the cloud patterned decorative scissors.


4.     Saturate the lovebirds stamp with the ink pad. Stamp the image on to the pale pink square, placing the image so that there is room to write underneath it. Allow time for the ink to dry.


5.     Write “lovebirds” under the stamped image with the marker.


6.     Punch four hearts from the card stock scraps from step 1.


7.     Glue the hearts on to the four corners of the pale pink card stock.


8.     Use the glue runner to attach the pale pink card stock on to the front panel of the card.


Come back on Friday for one of my favourite cards in this entire series. See you then!

Monday, January 17, 2011

Countdown to Valentine's Day: Card 1


The heart block card


Valentine’s Day. A day that is seemingly either loved or hated with equal intensity by all of humankind. Whatever your feelings on the day, however, Card Tricks is going to devote the next few weeks to Valentine’s Day cards.

So, if you jump for joy every time February the 14th comes around, you’ll soon have lots of great ideas for crafting cards for that special someone in your life. If you cringe at the very mention of the day, at least give me the chance to show you that not all things related to the day are evil and vile. Many of the card designs that will be revealed during this series can easily be adapted for other occasions (for example, you can replace the hearts on today’s card with flowers, snowflakes, balloons, etc. to celebrate Mother’s Day, winter holidays, birthdays and so much more) or you can simply use them as is (with different sentiments) for anniversaries or weddings. Heck, you can even alter them for Anti-Valentine’s Day purposes, but I’ll leave those creative modifications up to your own imaginations.

There are two different methods you can use to make this card. The second method is easier and faster to do. In fact, I only did the first method because I wanted to get some practice doing paper weaving for future projects.

Supplies:
·      Sheet of 8 1/2” x 11” dark pink cardstock
·      Sheet of 8 1/2” x 11” light pink cardstock

Equipment:
·      Paper trimmer
·      Bone folder
·      Large heart paper punch (cutouts should measure approximately 1 3/8” x 1 7/8”)
·      Glue stick
·      Wax paper
·      Heavy book

Additional Equipment needed for Method A:
·      Pencil
·      Metal-edged ruler
·      Craft knife

Directions for Method A – The Weaved Card Option:
1.     Use the paper trimmer to cut a piece of dark pink card stock, measuring 5” x 10”. Hold on to the scraps to make the hearts in step 4.

2.     Fold the 5” x 10” piece of dark pink card stock into a 5” x 5” card with the bone folder.

3.     Cut the light pink card stock with the paper trimmer to get a 2 1/2” x 11” strip. Trim the strip so that you have two pieces, each measuring 2 1/2” x 5”. Hold on to the scraps for step 4.

4.     Punch a total of four hearts, two each from the scraps of the dark pink card stock and the light pink card stock. Punch the light pink card stock in a way that leaves you a piece of card stock that is at least 4” x 8”. Hold on to that piece to make this coming Wednesday’s card.


5.     Open the dark pink card and make guidelines for cutting a horizontal line in the middle of the inside left panel (2 1/2” from the top).


6.     Use the craft knife and metal-edged ruler to cut along the guidelines from the edge of the card to the fold.


7.     Close the card. Take the first strip of light pink card stock and weave it into the left side of the front panel (right up against the fold) so that the top of the strip is underneath the front panel and the bottom is on top (to create a checkerboard pattern). Glue the strip into place.


8.     Weave the second strip of light pink card stock into the right side of the front panel (right up against the other strip) so that the bottom of the strip is underneath the front panel and the top of the strip is on top. Glue into place.


9.     If there is any overlap of light pink card stock along the edges of the card, trim it off with the paper trimmer.

10. Glue the light pink hearts on to the dark pink squares and the dark pink hearts on to the light pink squares.


11. Place the piece of wax paper on top of the closed card. Put the book on top and press until the glue is dry.

Directions for Method B – The Square Blocks Option (easier and faster):
1.     Use the paper trimmer to cut a piece of dark pink card stock, measuring 5” x 10”. Hold on to the scraps to make the hearts in step 4.

2.     Fold the 5” x 10” piece of dark pink card stock into a 5” x 5” card with the bone folder.

3.     Cut two 2 1/2” square pieces of light pink card stock. Hold on to the scraps for step 4.

4.     Punch a total of four hearts, two each from the scraps of the dark pink card stock and the light pink card stock. Punch the light pink card stock in a way that leaves you a piece of card stock that is at least 4” x 8”. Hold on to that piece of card stock to make this coming Wednesday’s card.


5.     Glue the first light pink square on to the lower left corner of the card and the second square on to the upper right corner, making a checkerboard pattern.


6.     Glue the light pink hearts on to the dark pink squares and the dark pink hearts on to the light pink squares.


7.     Place the piece of wax paper over top of the closed card. Put the book on top and press until the glue is dry.

Remember to hold on to the remaining light pink card stock to make Wednesday’s card. See you then!